WhatsApp Chat Help

Tag: WhatsApp Chat

  • How to Add WhatsApp Chat to WordPress Footer Without a Plugin

    How to Add WhatsApp Chat to WordPress Footer Without a Plugin

    WhatsApp chat WordPress footer integration might be the simplest way to turn your silent visitors into loyal customers. Why? Because when your chat button lives in the footer, it’s quietly available—on every page, at every scroll, and at the exact moment someone thinks, “I have a question.”

    Whether you’re running a blog, a service site, or a WooCommerce store, giving your users a quick and familiar way to reach you via WhatsApp makes your site feel alive, accessible, and trustworthy.

    In this guide, you’ll learn 3 easy ways to add WhatsApp chat WordPress footer—manually, with a widget, or using the free and powerful Chat Help plugin. No coding experience required (unless you want it). Just results.

    Table of Contents

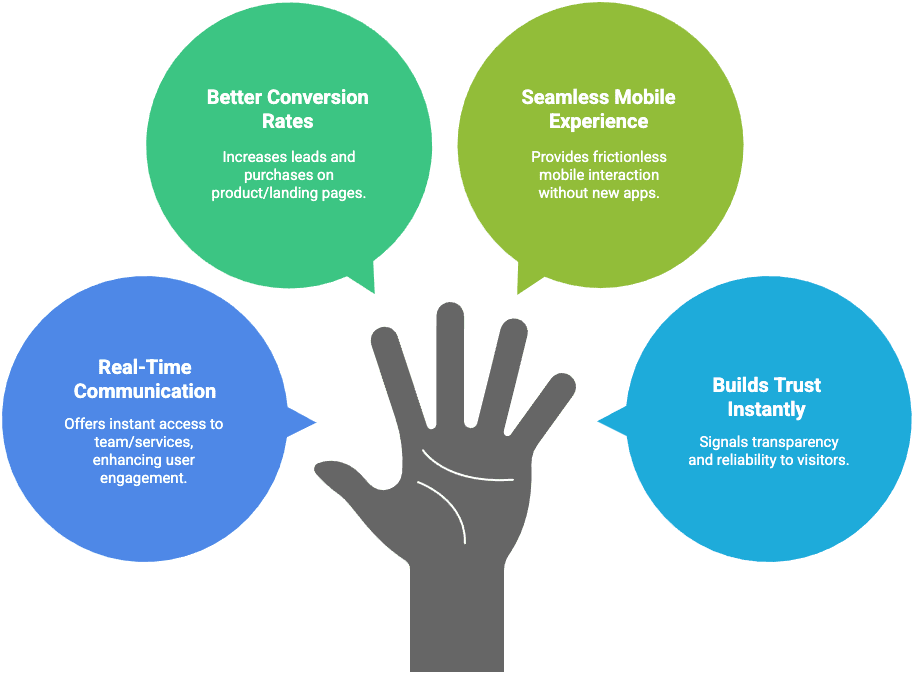
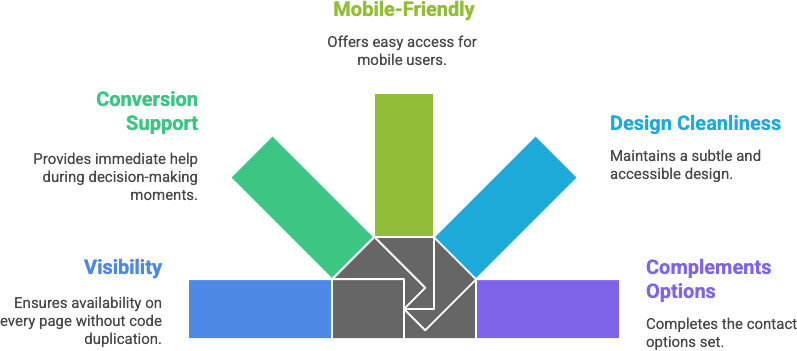
    Adding WhatsApp chat WordPress footer is one of the smartest ways to keep communication open without disrupting the user experience. The footer is visible on every page—making it a perfect, consistent location for your support or sales link.

    Here’s why placing WhatsApp in your site’s footer is a smart move:

    1. Always Accessible, Always Visible

    Visitors can reach out no matter where they are on your site. A footer-based WhatsApp chat icon ensures help is just a click away.

    2. Cleaner Design

    Placing the WhatsApp chat in the footer avoids cluttering the header or main content. It looks clean and professional, especially on minimal or mobile-first themes.

    3. Boosts Trust and Support Response Rates

    When users know you’re just a tap away, they feel more confident. It reduces bounce and encourages them to reach out instead of leaving your site with unanswered questions.

    Why Add WhatsApp Chat to the Footer

    Want to add WhatsApp chat WordPress footer without touching a single line of code? The Custom HTML widget is your friend.

    This method is perfect for beginners—and works with nearly any WordPress theme that supports widgets in the footer.

    🔧 Step-by-Step Instructions

    ✅ Step 1: Go to Appearance → Widgets

    • In your WordPress dashboard, head to Appearance → Widgets.
    • Find a widget area labeled Footer, Footer 1, or similar. (You can use any widget-enabled area.)

    ✅ Step 2: Add a Custom HTML Block

    • Click “+ Add Block” or “+ Widget” depending on your theme.
    • Choose Custom HTML from the available block types.
    <a href="https://wa.me/14151234567?text=Hi%20there!%20I%20have%20a%20question." target="_blank">
      <img src="https://yourdomain.com/path-to-whatsapp-icon.png" alt="Chat with us on WhatsApp" style="width:50px;height:auto;">
    </a>

    📝 Replace:

    • 14151234567 with your WhatsApp or WhatsApp Business number in international format
    • The message after text= with your preferred pre-filled greeting
    • The image URL with the path to your own WhatsApp icon

    💡 Pro Tip:

    Use a URL encoder like urlencoder.io to make sure your message text is properly formatted. Example:

    Hi there! I have a question about your services. → Hi%20there!%20I%20have%20a%20question%20about%20your%20services.

    🖼️ Optional: Add Some Styling

    You can add simple CSS (in Appearance → Customize → Additional CSS) to make the icon float or adjust size/spacing. More on that in Section 6.

    If you want maximum control over placement and styling, adding your WhatsApp chat link directly into the footer.php file of your theme is the way to go.

    This method is ideal for developers or site owners comfortable with editing theme files.

    ⚠️ Before You Start

    🔒 Important: Always back up your theme files or use a child theme before editing core theme code to prevent breaking your layout or losing changes after updates.

    🔧 Step-by-Step Instructions

    • From your dashboard, go to:
      Appearance → Theme File Editor → footer.php

    Or access the file directly via FTP or your hosting file manager at:
    /wp-content/themes/your-theme/footer.php

    Place the following code before the closing </body> tag:

    <div class="whatsapp-float">
      <a href="https://wa.me/14151234567?text=Hi%20there!" target="_blank" rel="noopener">
        <img src="https://yourdomain.com/path-to-whatsapp-icon.png" alt="Chat with us on WhatsApp" style="width:50px;height:auto;">
      </a>
    </div>

    📝 As before:

    • Replace the phone number and message with your own
    • Use your own icon URL or a CDN-hosted image (with transparent background if possible)

    🎨 Step 3: Add Styling via CSS

    Paste the following into your theme’s style.css or Appearance → Customize → Additional CSS:

    .whatsapp-float {
      position: fixed;
      bottom: 20px;
      right: 20px;
      z-index: 9999;
    }

    This will float your WhatsApp icon in the bottom-right corner—visible on every page, no plugin needed.

    ✅ Why Use This Method?

    • Cleaner HTML output (vs. widgets)
    • Can conditionally display the button only on certain page types using PHP
    • Great for custom or lightweight themes with no widget support
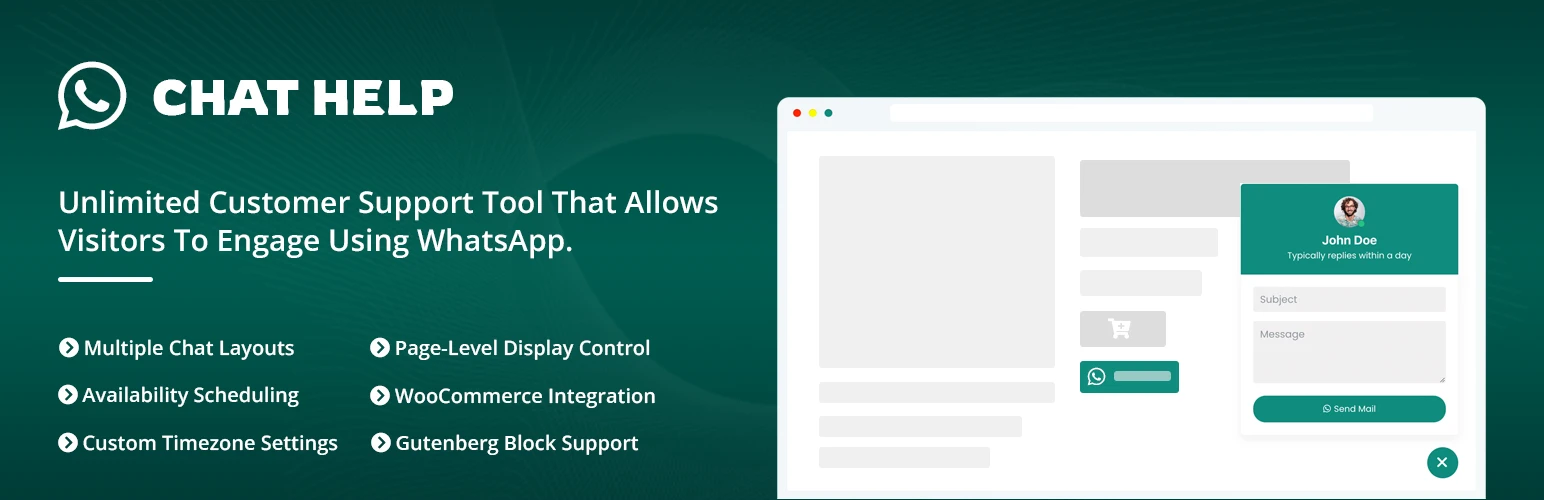
    If you want the power of a floating WhatsApp chat button—without touching code or theme files—then the Chat Help plugin is the easiest, fastest way to get it done.

    Whether you run a blog, business site, or WooCommerce store, Chat Help makes it effortless to:

    • Show a WhatsApp button in the footer
    • Customize its design
    • Add support for product pages, groups, and more

    And the best part? It’s completely free for the core features.

    ✅ Step 1: Install the Plugin

    • Go to Plugins → Add New
    • Search for Chat Help
    • Click Install, then Activate

    🔗 Or download it directly from WordPress.org

    ✅ Step 2: Configure WhatsApp Settings

    • Go to the WhatsApp menu from your dashboard menu
    • Select the type of layout you want to use
    • Enter your WhatsApp number (international format)
    • Customize the welcome message that users will send
    • Choose:
      • Icon color
      • Button label
      • Position (right, left, bottom, etc.)

    ✅ Preview changes live
    ✅ Works sitewide without touching your footer.php

    ✅ Bonus: WooCommerce & Group Features

    With Chat Help, you can also:

    • Show WhatsApp buttons on product pages
    • Let users join WhatsApp groups for support or updates

    Perfect for:

    • Small businesses
    • Support teams
    • Online stores

    🔧 Prefer to manually place a button with shortcode?

    You can use:

    [ctw style="1" primary_color="#118c7e" secondary_color="#0b5a51" padding="7px 18px 7px 10px" number="+8815647788844" timezone="Asia/Dhaka" photo="https://chathelp.themeatelier.net/wp-content/plugins/chat-help-pro/src/assets/image/user.webp" name="Jhon" designation="Techinical support" label="How can I help you?" online="I am online" offline="I am offline" visibility="wHelp-show-everywhere" sizes="wHelp-btn-lg" sunday="00:00-23:59" monday="23:00-23:59" tuesday="00:00-23:59" wednesday="00:00-23:59" thursday="00:00-23:59" friday="00:00-23:59" saturday="00:00-23:59"]

    And insert it anywhere—even your footer widget, Elementor, or site builder sections.

    6. Style Your WhatsApp Button with CSS (Optional)

    Want your WhatsApp chat button to float in the corner like modern live chat widgets? You don’t need a plugin for that—just a few lines of CSS will do the trick.

    Whether you placed your button using a widget, HTML block, or theme file, this styling will make sure it always stays visible and clickable.

    ✅ Step 1: Wrap Your Button in a Container

    Update your WhatsApp link HTML like this:

    <div class="whatsapp-float">
      <a href="https://wa.me/14151234567?text=Hi%20there!" target="_blank" rel="noopener">
        <img src="https://yourdomain.com/path-to-whatsapp-icon.png" alt="Chat with us on WhatsApp" style="width:50px;height:auto;">
      </a>
    </div>

    ✅ Step 2: Add the Floating Style

    Paste the following CSS in one of these places:

    • Appearance → Customize → Additional CSS
    • Or in your child theme’s style.css file
    .whatsapp-float {
      position: fixed;
      bottom: 20px;
      right: 20px;
      z-index: 9999;
    }

    💡 Customization Tips:

    PropertyWhat It Does
    bottom & rightControls placement — tweak for spacing
    z-indexKeeps it above other elements
    width on <img>Adjusts button size
    hover stylesYou can add hover effects too!

    With just a few lines of CSS, your WhatsApp button will float on all pages, stay visible on scroll, and offer instant access to you or your team—no plugin required.

    7. How to Add a WhatsApp Chat Button in Elementor (No Plugin Needed)

    If you’re using Elementor, adding a custom WhatsApp chat button is incredibly simple—and you don’t need any plugin for it.

    You can place your chat button in the footer, sidebar, header, or anywhere inside a page or post using Elementor’s drag-and-drop builder.

    ✅ Step-by-Step Instructions

    🔹 Step 1: Open the Page or Template in Elementor

    • Go to the page, post, or global template where you want to add the WhatsApp button.
    • Click Edit with Elementor.

    🔹 Step 2: Add a Button Widget

    • Drag the Button widget to your desired location.
    • Under Content, set:
      • Text: e.g., “Chat with us on WhatsApp”
      • Link:
    https://wa.me/14151234567?text=Hi%20there!%20I%20have%20a%20question.

    Replace the number and message as needed.

    • ✅ Toggle “Open in new window” so users don’t lose your site.

    🔹 Step 3: Add WhatsApp Icon (Optional)

    • Under Icon, search for “WhatsApp” or upload your own icon (SVG or PNG).
    • Adjust icon position and spacing as needed.

    🔹 Step 4: Style Your Button

    • Go to the Style tab to change:
      • Colors (match your brand)
      • Border radius
      • Padding/margin
      • Font size

    💡 Pro Tip:

    Want it to float like a chat bubble? Wrap the button in an HTML widget with the .whatsapp-float class, and apply the floating CSS from the previous section.

    Elementor makes it easy to build a beautiful WhatsApp chat button—and you get full control over placement, styling, and interaction.

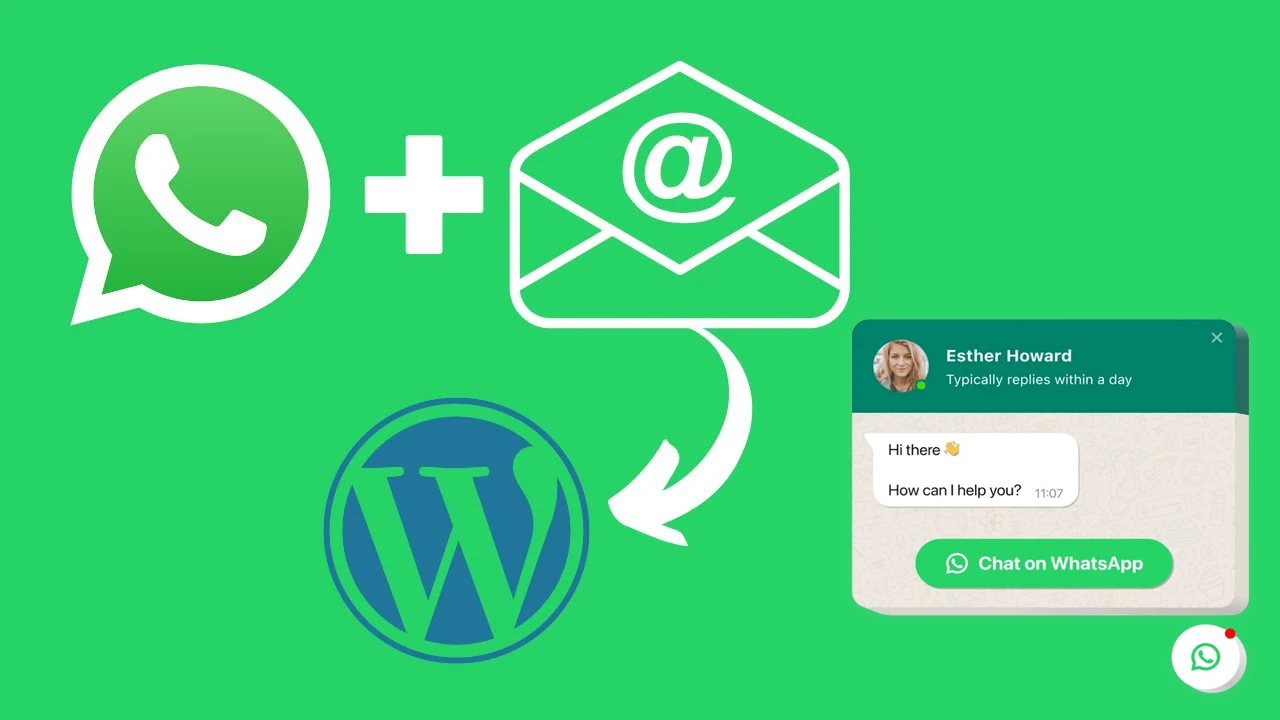
    8. Bonus: Pre-Fill Message Text for Better Engagement

    One of WhatsApp’s most useful features is the ability to pre-fill a custom message that users send when they click your chat link. This saves time for your visitors and gets conversations started faster.

    By guiding users with a ready-to-send message, you reduce friction and increase the chances they’ll actually reach out.

    ✅ How It Works

    The format for a WhatsApp chat link with a pre-filled message is:

    https://wa.me/14151234567?text=Your%20message%20here

    Make sure to URL-encode the message using %20 for spaces or an online URL encoder.

    💬 Examples of Conversion-Friendly Messages

    Use these proven message formats to encourage engagement:

    • Hi! I’m interested in your services. Can you tell me more?
    • Hello, I have a quick question about one of your products.
    • Hi there 👋 Can you help me with my order?
    • I’d like to request a quote.
    • Hey! I want to know your availability this week.

    Encoded Example:

    https://wa.me/14151234567?text=Hi%20there!%20Can%20you%20help%20me%20with%20my%20order%3F

    💡 Pro Tip:

    Test multiple messages over time to see which one gets the most responses. Use analytics or heatmaps to track conversions if you’re serious about optimizing performance.

    9. Final Thoughts

    Adding a WhatsApp chat button to your WordPress footer doesn’t require any plugin if you prefer a lightweight, code-based approach.

    By using a simple HTML link, floating CSS, or Elementor’s visual builder, you can give your visitors a direct, personal way to reach you instantly—which helps build trust, close sales faster, and deliver better support.

    🔄 Recap:

    • You learned how to generate your WhatsApp chat link
    • Added it to your footer manually, with or without Elementor
    • Styled it to float elegantly like modern chat apps
    • Pre-filled messages for faster engagement

    💡 Prefer a no-code, feature-rich solution with WooCommerce support, floating chat bubbles, group links, and more?
    👉 Try the Chat Help Plugin — it’s free, fast, and made for WordPress. For advanced features you may also try Chat Help Pro Plugin.

    How do I add WhatsApp chat WordPress footer without using a plugin?

    You can add WhatsApp chat WordPress footer by manually inserting a WhatsApp click-to-chat link using a Custom HTML widget. This method doesn’t require any plugin and keeps your site lightweight.

    Is it possible to float the WhatsApp chat button in the footer area?

    Yes, to float the button, wrap the HTML link in a <div> with a custom class and use CSS to fix its position at the bottom right. This is a simple way to add WhatsApp chat WordPress footer while keeping it always visible.

    Can I use Elementor to add WhatsApp chat to WordPress footer?

    Absolutely. Elementor’s Button widget lets you easily insert your WhatsApp chat link, customize the label and icon, and place it in the footer area. It’s a visual, code-free way to add WhatsApp chat WordPress footer.

    Why should I add WhatsApp chat WordPress footer instead of using a plugin?

    Adding WhatsApp chat manually avoids plugin bloat, improves site speed, and gives you full design control. This method is perfect for developers and minimal setups.

    How can I customize the WhatsApp chat icon in the WordPress footer?

    You can upload any icon image and use it in your HTML code. For example, replace the image URL with your custom icon and still maintain your ability to add WhatsApp chat WordPress footer in your brand’s style.

  • How to Add WhatsApp Chat to WooCommerce Product Pages (Step-by-Step)

    How to Add WhatsApp Chat to WooCommerce Product Pages (Step-by-Step)

    WhatsApp chat WooCommerce functionality has become a must-have for modern online stores. Customers expect fast answers before they make a purchase—and nothing’s faster than tapping a WhatsApp button directly from a product page.

    In this step-by-step guide, you’ll learn how to add WhatsApp chat WooCommerce buttons using two proven methods:

    • Manually, with a bit of HTML (no plugin required)
    • Using the Chat Help plugin, perfect for beginners and WooCommerce store owners

    Whether you’re a developer looking for control, or a store owner who wants quick setup, this guide has you covered. Let’s start with why adding WhatsApp chat to product pages is such a smart move.

    Why Add WhatsApp Chat to WooCommerce Product Pages?

    Adding WhatsApp chat WooCommerce integration directly to your product pages gives customers a frictionless way to ask questions and make buying decisions faster.

    Here’s why you should consider adding it:

    1. Boost Conversions

    Live chat helps resolve doubts in real-time. A simple “Do you ship to my country?” or “Is this available in blue?” can turn hesitation into a sale.

    2. Build Instant Trust

    WhatsApp is familiar. When users see it, they know they’ll reach a real person—not a slow contact form or support ticket.

    3. Reduce Cart Abandonment

    Pre-sale questions left unanswered often result in abandoned checkouts. A WhatsApp chat option helps close the gap.

    4. Improve Mobile Experience

    Since WhatsApp is already on most customers’ phones, they can contact you in one tap—without needing to switch apps or wait.

    WhatsApp chat WooCommerce

    Method 1: Manual WhatsApp Chat Button

    If you’re looking to keep your store lightweight and avoid adding another plugin, you can easily create a WhatsApp chat WooCommerce button using basic HTML. This method gives you full control over placement and styling—ideal for developers or anyone comfortable editing theme files.

    WhatsApp offers a click-to-chat feature that lets users open a chat with you instantly.

    Format:

    https://wa.me/<your-number>?text=<your-encoded-message>

    Example:

    https://wa.me/14151234567?text=Hi!%20I%20have%20a%20question%20about%20this%20product.

    Use a URL encoder to encode spaces and symbols in your message.

    Step 2: Customize Message with Dynamic Product Info

    If you want your message to reference the product name, use WooCommerce’s dynamic PHP like this:

    $product = wc_get_product( get_the_ID() );
    $product_name = $product->get_name();

    Then pass it into your WhatsApp link (in a template file like single-product.php):

    <a href="https://wa.me/14151234567?text=Hi! I'm interested in <?php echo urlencode($product_name); ?>" target="_blank">
      Chat on WhatsApp
    </a>

    This makes each button specific to the product being viewed.

    Step 3: Add the Button Using a WooCommerce Hook

    The easiest place to add a WhatsApp chat button is right below the “Add to Cart” button.

    Paste this into your functions.php file or a custom plugin:

    add_action( 'woocommerce_after_add_to_cart_button', 'custom_whatsapp_chat_button' );
    function custom_whatsapp_chat_button() {
        global $product;
        $product_name = $product->get_name();
        $link = 'https://wa.me/14151234567?text=' . urlencode("Hi! I'm interested in " . $product_name);
        echo '<a href="' . esc_url($link) . '" class="button whatsapp-chat" target="_blank">Chat on WhatsApp</a>';
    }

    Step 4: Style Your Button with CSS

    Here’s a basic example to match WooCommerce buttons:

    .whatsapp-chat {
      display: inline-block;
      margin-top: 10px;
      background-color: #25d366;
      color: white;
      padding: 10px 20px;
      border-radius: 4px;
      text-decoration: none;
    }
    .whatsapp-chat:hover {
      background-color: #1ebe5b;
    }

    Tip: Add this CSS to Customizer → Additional CSS or your theme’s stylesheet.

    Step 5: Test on Desktop & Mobile

    Make sure the button:

    • Opens WhatsApp Web on desktop
    • Opens the WhatsApp app on mobile
    • Pre-fills the correct product name in the message

    If this feels too technical or you want more visual control, keep reading. The Chat Help plugin offers an easier and more flexible solution, with WooCommerce integration built in.

    Method 2: Add WhatsApp Chat Using Chat Help Plugin

    If you prefer a faster, code-free setup—or want extra features like WooCommerce integration, group invite links, and floating chat bubbles—then the Chat Help plugin is the best way to add WhatsApp chat WooCommerce functionality to your store.

    No PHP editing. No shortcodes to remember. Just install, configure, and start chatting.

    Step 1: Install and Activate the Plugin

    1. Go to your WordPress dashboard
    2. Navigate to Plugins → Add New
    3. Search for Chat Help
    4. Click Install Now, then Activate

    You’ll find Chat Help settings under the Settings or its own menu in your dashboard sidebar.

    Step 2: Configure WhatsApp Chat Settings

    Once activated:

    • Enter your WhatsApp or WhatsApp Business number in international format (e.g., +14151234567)
    • Add a pre-filled message like: “Hi! I have a question about this product.”
    • Customize the chat bubble:
      • Button color, icon, position (bottom-right, bottom-left, etc.)
      • Text label
      • Visibility on desktop/mobile

    Step 3: Enable WooCommerce Integration

    Chat Help lets you display WhatsApp buttons on:

    • Single product pages
    • Product loop views (like category and shop pages)

    You’ll find WooCommerce-specific settings inside the plugin dashboard. Just toggle on the options you want—no coding required.

    Step 4: Use Dynamic Product Info in Messages

    For better personalization, you can include product-specific data in pre-filled messages.

    Example:

    Hi! I’m interested in the product "{productName}" I saw on your site.

    The plugin will automatically replace [Product Name] with the correct product title, making the conversation more seamless and context-aware.

    Step 5: Customize Button Styles & Placement

    Within the plugin interface, you can:

    • Change button size, shape, and alignment
    • Choose bubble vs inline styles
    • Set display rules (only show on product pages, hide on cart/checkout)

    This makes it perfect for non-technical users who want professional results.

    Why Choose Chat Help Plugin for WooCommerce?

    FeatureManual MethodChat Help Plugin
    Code-Free Setup
    WooCommerce Integration⚠️ Requires PHP✅ Built-in toggle
    Group Invite Links
    Pre-Filled Messages✅ (More flexible)
    Design CustomizationLimited✅ Full visual controls
    Elementor & Gutenberg CompatibleManual Only✅ Native support

    Style and Position the Button

    Once your WhatsApp chat WooCommerce button is working, the next step is making it look and feel like a natural part of your store. Whether you want a subtle inline button or an eye-catching floating bubble, here’s how to customize it.

    A. Styling Options with Chat Help Plugin (No Code)

    Chat Help includes a built-in design panel that lets you adjust:

    • Button shape: Rounded, square, or circle
    • Size: Small, medium, large
    • Color: Match your brand’s color palette
    • Position: Fixed (floating) or inline
    • Visibility: Desktop only, mobile only, or both

    All changes are previewed live in the dashboard—so you can fine-tune appearance without touching CSS.

    B. Floating Chat Bubble Example

    Want a floating WhatsApp bubble in the bottom-right corner of every product page?

    With Chat Help, just:

    1. Enable floating bubble option in settings
    2. Choose bottom right or bottom left
    3. Customize the label/icon to match your brand

    💡 Add image alt text: Be sure to set your chat icon’s alt attribute to something SEO-friendly like: alt="WhatsApp chat WooCommerce button"

    C. Styling the Manual Button with CSS

    If you’re using the manual method, you can fully control the button’s look with custom CSS. Here’s a quick example:

    .whatsapp-chat {
      background-color: #25D366;
      color: #fff;
      padding: 12px 24px;
      border-radius: 6px;
      text-align: center;
      display: inline-block;
      font-weight: bold;
      margin-top: 10px;
      text-decoration: none;
    }
    .whatsapp-chat:hover {
      background-color: #1ebe5b;
    }

    You can also float the button using:

    .whatsapp-float {
      position: fixed;
      bottom: 20px;
      right: 20px;
      z-index: 999;
    }

    Wrap your anchor tag inside a <div class="whatsapp-float">...</div> to keep it always visible.

    Tips for Better Design Integration

    • Use consistent padding and fonts to match WooCommerce buttons
    • Keep contrast high (green on white or white on green)
    • Avoid clutter: show the chat only where it adds value (product pages, not checkout)
    • Test mobile layout to make sure it doesn’t overlap important elements

    Pre-Fill Product Info in Messages

    One of the most powerful things you can do with WhatsApp chat WooCommerce integration is personalize the message that gets sent when a customer clicks the button.

    By automatically including the product name, SKU, or price, you make it easier for both the customer and your team to stay on the same page.

    Using Dynamic Tags with Chat Help Plugin

    The Chat Help plugin supports dynamic message templates using shortcodes or smart tags (depending on the version you’re using).

    Example pre-filled message: Hi! I’m interested in {ProductName}. Can you tell me more about it?

    If supported in your plugin version, [Product Name] will automatically be replaced by the WooCommerce product title on that page.

    Check the plugin’s documentation for available variables like:

    • {ProductName}
    • {ProductURL}
    • {ProductSKU}

    You can enter these tags in the message template field in the plugin settings.

    Manual Method: Insert Product Info via PHP

    If you’re using the manual code method, you can dynamically generate the WhatsApp message using PHP:

    add_action( 'woocommerce_after_add_to_cart_button', 'custom_whatsapp_chat_button' );
    function custom_whatsapp_chat_button() {
        global $product;
        $product_name = $product->get_name();
        $link = 'https://wa.me/14151234567?text=' . urlencode("Hi! I'm interested in " . $product_name);
        echo '<a href="' . esc_url($link) . '" class="button whatsapp-chat" target="_blank">Chat on WhatsApp</a>';
    }

    This ensures every product page sends a unique, personalized message to your WhatsApp inbox.

    Why Personalized Messages Matter

    • Saves the customer time: No need to type what they’re interested in
    • Reduces confusion for your support or sales team
    • Makes the interaction feel customized and professional
    • Increases the chance of a sale because the buyer already feels heard

    Final Thoughts

    Adding WhatsApp chat WooCommerce functionality to your product pages is one of the simplest, highest-impact upgrades you can make to your online store.

    Whether you’re a developer who prefers the manual method or a store owner looking for a no-code solution with built-in WooCommerce support, you now have two powerful ways to make it happen:

    Option 1: Manual Method

    • Lightweight, flexible
    • Ideal for developers
    • Can include dynamic product info using PHP
    • Requires theme file edits and styling with CSS

    Option 2: Chat Help Plugin

    • Beginner-friendly and plugin-based
    • Drag-and-drop customization
    • Works with Elementor, Gutenberg, and any theme
    • Includes WooCommerce integration, shortcode support, and group links
    • Takes just minutes to set up

    Whichever path you choose, you’re giving your customers what they want: a fast, personal, and familiar way to reach you directly from your product pages. And that’s a win for both trust and conversions.

    Can I add WhatsApp chat to WooCommerce without a plugin?

    Yes! You can manually add a WhatsApp chat WooCommerce button using HTML and PHP. By placing a click-to-chat link inside a WooCommerce hook, you can create custom buttons that appear on product pages—without installing any plugin.

    What is the best plugin to add WhatsApp chat to WooCommerce?

    The Chat Help plugin is a top choice for WooCommerce users. It supports floating chat bubbles, WooCommerce product page integration, shortcode placement, and even WhatsApp group links—all without requiring code.

    Will WhatsApp chat buttons work on mobile and desktop?

    Yes. On mobile devices, the button opens the WhatsApp app. On desktops, it opens WhatsApp Web. This ensures your WhatsApp chat WooCommerce setup works smoothly across all platforms.

    Can I include product information in the WhatsApp message?

    Absolutely. You can pre-fill messages with dynamic content like product name or SKU. The Chat Help plugin supports this with dynamic tags, and developers can use PHP to generate messages programmatically.

    Does adding WhatsApp chat slow down my WooCommerce store?

    No. When implemented correctly—either manually or using a lightweight plugin like Chat Help—WhatsApp chat WooCommerce integration has minimal performance impact and can actually improve conversions by streamlining customer communication.

  • How to Add WhatsApp Chat in Elementor (With and Without Plugin)

    How to Add WhatsApp Chat in Elementor (With and Without Plugin)

    WhatsApp chat Elementor is one of the most searched features among WordPress users, and for good reason. Elementor makes it incredibly easy to design beautiful pages, but when it comes to integrating direct messaging tools like WhatsApp, things can get a little… technical. If you’re building a support-driven site, mastering how to add WhatsApp chat Elementor functionality is a huge win.

    Luckily, whether you’re a no-code creator, a freelancer, or a WooCommerce store owner, adding WhatsApp chat to your Elementor-built website is totally doable—and you have two great options:

    • Without a plugin, for those who prefer full control and minimal load.
    • With a plugin for those who want speed, extra features, and WooCommerce support.

    In this step-by-step guide, you’ll learn exactly how to add WhatsApp chat to Elementor—the fast, flexible, and frustration-free way.

    Why Add WhatsApp Chat to Elementor Pages?

    Your Elementor site is beautifully designed—don’t let your contact options slow it down.

    Adding WhatsApp chat Elementor support lets you create fast, conversion-friendly experiences right inside your page builder. For users who prefer building without code, this method of implementing WhatsApp chat Elementor is ideal.

    Here’s why it’s a smart move:

    📞 Real-Time Communication

    No waiting for emails or slow form replies. Visitors get instant access to your team or services.

    🛍️ Better Conversion Rates

    For product pages, landing pages, or sales funnels, having WhatsApp chat can dramatically increase leads and purchases.

    📱 Seamless Mobile Experience

    Since WhatsApp is already on your visitor’s phone, tapping a chat button is frictionless—no new apps, no new tabs.

    🔒 Builds Trust Instantly

    Showing a WhatsApp contact option signals that you’re transparent, reachable, and reliable.

    WhatsApp chat Elementor

    How to Add WhatsApp Chat Elementor Without a Plugin

    If you want to keep your site lightweight and avoid adding extra plugins, you can manually create a WhatsApp chat button in Elementor using a standard click-to-chat link.

    It takes just a few steps and gives you full control over how the button looks and behaves.

    WhatsApp allows you to create a special link that opens a chat with your number and even includes a pre-filled message.

    🔗 Basic Format:

    https://wa.me/<number>?text=<message>

    Replace <number> with your full international phone number (no spaces, no + sign).

    Replace <message> with a URL-encoded greeting like:

    “Hi! I’m interested in your services.”

    Example:

    https://wa.me/14151234567?text=Hi!%20I’m%20interested%20in%20your%20services.

    💡 Use a free tool like urlencoder.org to encode custom messages properly.

    🖱️ Step B: Use Elementor Button for WhatsApp Chat Elementor Setup

    1. Open your page in Elementor.
    2. Drag and drop a Button widget where you want the WhatsApp chat to appear.
    3. Under the Link field, paste your generated wa.me URL.
    4. Set Button Text (e.g., “Chat with Us on WhatsApp”).
    5. Toggle on “Open in New Window”
    6. (Optional) Add an icon from Elementor’s library (WhatsApp-style icon or speech bubble).

    You can drop your WhatsApp chat Elementor buttons inside landing pages, product pages, or even popups using Elementor widgets.

    🎨 Step C: Make It Look Like a Floating Chat Button (Optional)

    Want that familiar floating WhatsApp icon in the corner of your site?

    Here’s how to create it manually:

    1. Assign a custom class to your button (e.g., whatsapp-float)

    In the Advanced tab of the Elementor Button settings, set the CSS Class to: whatsapp-float

    2. Add this CSS:

    Go to Customizer → Additional CSS or Elementor’s Custom CSS (Pro):

    .whatsapp-float {
      position: fixed;
      bottom: 20px;
      right: 20px;
      z-index: 999;
    }

    This pins the button to the bottom-right corner of your page so it’s always visible, just like a chat bubble.

    How to Add WhatsApp Chat Elementor with Chat Help Plugin

    If you prefer a faster, feature-rich option without writing code, the Chat Help plugin makes it incredibly easy to add WhatsApp chat across your site—including pages built with Elementor.

    This method is perfect if you want:

    • A floating WhatsApp bubble that works on every page
    • WooCommerce integration
    • Group invite links
    • Full shortcode and styling control
    • Zero technical setup

    🔧 Step A: Install and Activate Chat Help

    1. From your WordPress dashboard, go to Plugins → Add New
    2. Search for “Chat Help”
    3. Click Install and then Activate

    You’ll now see a WhatsApp settings panel as your WordPress dashbaord menu.

    🔢 Step B: Configure the Basics

    1. Enter your WhatsApp or WhatsApp Business number in international format (e.g., +14151234567)
    2. Write a friendly pre-filled message that will appear when users click the button
    3. Customize your chat bubble appearance—icon, color, size, position
    4. Choose whether the chat bubble should show on:
      • All pages
      • Just desktop or mobile
      • Specific post types or categories

    🛒 Step C: Enable WooCommerce WhatsApp Buttons (Optional)

    If you run a WooCommerce store, Chat Help can display WhatsApp buttons:

    • On product pages
    • Inside product loops (category and shop views)

    This makes it easy for shoppers to ask product-specific questions, which can help reduce abandoned carts and increase conversions.

    🔗 Step D: Add WhatsApp Chat in Elementor Using Shortcodes

    Want to place the button inside an Elementor section? The Chat Help plugin is fully compatible with WhatsApp chat Elementor needs, giving you shortcode control inside visual layouts.

    1. Drag the Shortcode widget into your layout
    2. Paste a shortcode like:
    [ctw style="1" primary_color="#118c7e" secondary_color="#0b5a51" padding="7px 18px 7px 10px" number="+8815647788844" timezone="Asia/Dhaka" photo="https://chathelp.themeatelier.net/wp-content/plugins/chat-help-pro/src/assets/image/user.webp" name="Jhon" designation="Techinical support" label="How can I help you?" online="I am online" offline="I am offline" visibility="wHelp-show-everywhere" sizes="wHelp-btn-lg" sunday="00:00-23:59" monday="23:00-23:59" tuesday="00:00-23:59" wednesday="00:00-23:59" thursday="00:00-23:59" friday="00:00-23:59" saturday="00:00-23:59"]

    You can use multiple buttons with different messages or numbers throughout your Elementor site—super flexible.

    🚀 Why Use Chat Help?

    • Beginner-friendly and fast to set up
    • Works on any page builder (including Elementor)
    • Includes WooCommerce and WhatsApp group support
    • Fully customizable without touching code
    • Core features are 100% free

    Which Method Should You Use?

    Both methods—manual and plugin-based—will get WhatsApp chat up and running on your Elementor site. But the right choice depends on your goals, skill level, and site setup.

    Here’s a quick side-by-side comparison to help you decide:

    📊 WhatsApp Chat in Elementor – Manual vs Plugin Comparison

    Feature / FactorManual Method (No Plugin)Chat Help Plugin
    ✅ Lightweight setup✔️ No extra plugin installed✔️ Lightweight and optimized plugin
    ⚙️ Easy to configure❌ Requires some basic HTML/CSS✔️ Point-and-click setup in dashboard
    🎨 Design flexibility✔️ Full control via custom styles✔️ Built-in styling options
    🛍️ WooCommerce integration❌ Not available✔️ Buttons on product & loop pages
    💬 Pre-filled messages✔️ Via URL encoding✔️ Simple form field
    📱 Floating chat bubble✔️ Needs manual CSS✔️ Built-in with visual settings
    👥 WhatsApp group links❌ Not supported✔️ Easily added via settings
    🧩 Elementor compatibility✔️ Uses Button/HTML widgets✔️ Also works with Shortcode widget
    🔄 Display conditions❌ Manual control only✔️ Show/hide based on pages/devices
    🆓 Cost✔️ 100% free✔️ Core features are free, Pro version optional

    🧠 Choose the Manual Method If:

    • You want a fast, plugin-free solution
    • You’re comfortable adding links and CSS
    • You need a simple WhatsApp button, no extra features

    💡 Choose Chat Help Plugin If:

    • You want WooCommerce integration or group chat links
    • You prefer visual setup with no coding
    • You want a floating WhatsApp bubble site-wide
    • You need flexibility and scalability

    No matter which method you choose, you’re giving your visitors a faster, more personal way to reach you—and that’s always a win. 🏆

    Final Thoughts

    Adding WhatsApp chat in Elementor is one of the easiest, most effective ways to turn visitors into customers—and now you know how to do it both with and without a plugin.

    If you prefer a hands-on, minimal approach, the manual method gives you full control using just a wa.me link and an Elementor Button widget.

    But if you want extra features like:

    • A floating chat bubble
    • WooCommerce product buttons
    • WhatsApp group join links
    • Shortcode placement anywhere in Elementor…

    👉 Then the Chat Help plugin is your go-to solution. It’s free, beginner-friendly, and designed to work seamlessly with Elementor.

    Whether you go manual or plugin-powered, WhatsApp chat Elementor integration boosts engagement, trust, and response rates.

    Resources & Tools

    Here’s everything you need to complete your WhatsApp + Elementor setup:

    Can I add WhatsApp chat to Elementor without using any plugin?

    Yes! You can manually create a WhatsApp chat button in Elementor using a simple wa.me link and the Button widget. No plugin required—just HTML and optional CSS.

    How do I make the WhatsApp button float on all pages?

    Assign a custom class like .whatsapp-float to your button, then use CSS with position: fixed to place it in the corner. This mimics a floating chat bubble.

    Can I use this method on Elementor free version?

    Absolutely. The manual method works with Elementor Free. The plugin method (Chat Help) also works with both Free and Pro versions of Elementor.

    What’s the benefit of using a plugin like Chat Help instead?

    The Chat Help plugin adds advanced features like WooCommerce integration, group join links, shortcode placement, and a visual settings panel—without writing any code.

    Will this work on mobile devices too?

    Yes. WhatsApp chat buttons created via wa.me links automatically open the WhatsApp app on mobile and WhatsApp Web on desktop.

  • How to Add a WhatsApp Button on WordPress Website Without a Plugin

    How to Add a WhatsApp Button on WordPress Website Without a Plugin

    WhatsApp button WordPress without plugin is one of the most searched solutions for site owners who want to offer real-time chat without bloating their site with extra tools. In a world where instant communication drives conversions, WhatsApp has become a must-have on websites of all shapes and sizes. Whether you run a personal blog, a growing business, or a full-blown eCommerce store, giving your visitors the option to reach you through a familiar app like WhatsApp can boost trust, engagement, and sales.

    But here’s the catch: not everyone wants to install another plugin just to add a simple chat button.

    Plugins are powerful, but sometimes they can slow down your site, create compatibility issues, or just feel like overkill for something as straightforward as adding a clickable WhatsApp button.

    That’s where this guide comes in. We’re going to show you exactly how to add a WhatsApp chat button to your WordPress website—without using any plugin. No clutter, no overhead—just clean, lightweight code and full control.

    Should WhatsApp be integrated into the website?

    Why Add a WhatsApp Button to WordPress Without Plugin?

    While plugins offer convenience, there are several reasons you might want to take the manual route—especially for something as simple as a WhatsApp chat button.

    ⚡ Reduce Page Load Time

    Every plugin you install adds weight to your website. Going plugin-free keeps your site lean, fast, and optimized, which is great for both user experience and SEO. This method of adding a WhatsApp button WordPress without plugin keeps your site fast and flexible.

    🔐 Avoid Plugin Conflicts or Bloat

    Some plugins try to do too much. Others don’t play nice with your theme or existing tools. By using your own code, you avoid unnecessary bloat and reduce the risk of functionality clashes.

    🧼 Keep Your Site Minimal and Optimized

    Less is more—especially when it comes to WordPress. A custom WhatsApp button lets you keep your site minimalist and focused, without backend clutter.

    🎯 Full Control Over Placement and Behavior

    Want your button in the footer? Sidebar? Just on certain pages? When you build it yourself, you choose where and how it shows up, with no plugin limitations.

    Before adding a button, you need to generate your unique WhatsApp click-to-chat link. This link lets visitors start a conversation with you directly on WhatsApp—no phone number saving or app-hopping required.

    🔗 How It Works

    WhatsApp offers a simple URL structure that opens a chat with your number:

    https://wa.me/<number>?text=<message>
    • Replace <number> with your full phone number in international format (no spaces or dashes, no + sign).
    • Replace <message> with a URL-encoded version of your greeting message.

    Example:

    Let’s say your US number is +1 415 123 4567, and you want to pre-fill the message: “Hi! I have a question about your services.”

    Your link would look like:

    https://wa.me/14151234567?text=Hi!%20I%20have%20a%20question%20about%20your%20services.

    Clicking that link opens WhatsApp (or WhatsApp Web) with your number and message ready to go.

    🛠 Tool to Encode Your Message:

    To encode custom messages, use a free online URL encoder like urlencoder.org. This ensures your spaces and special characters are properly formatted.

    How to Add WhatsApp Button WordPress Without Plugin Using HTML

    Once your link is ready, the next step is to add it to your WordPress site using a simple anchor (<a>) tag and a WhatsApp icon.

    Here are three no-plugin methods for placing it wherever you need:

    1. Go to your WordPress dashboard → Appearance → Widgets
    2. Choose the Footer or Sidebar section
    3. Add a Custom HTML block
    4. Paste the following code:
    <a href="https://wa.me/14151234567?text=Hi%20there!" target="_blank">
      <img src="https://yourdomain.com/path-to-whatsapp-icon.png" alt="Chat with us on WhatsApp" style="width:50px;height:auto;">
    </a>

    Replace the link and image URL with your own values.

    🧱 Option B: Add to a Page or Post Using Gutenberg

    1. Open the WordPress block editor (Gutenberg) for your page or post
    2. Click Add Block → Custom HTML
    3. Paste the same code used above

    This lets you drop your WhatsApp button right inside your content, perfect for contact pages or CTAs.

    🧑‍💻 Option C: Add to a Template (for Developers)

    If you want the WhatsApp button to appear site-wide (e.g., in the header or footer), you can manually insert it into your theme files:

    • Go to Appearance → Theme File Editor
    • Open footer.php, header.php, or any other template file
    • Paste the anchor tag wherever you want the button to appear

    ⚠️ Tip: Always use a child theme or backup before editing theme files.

    Style Your WhatsApp Button WordPress Without Plugin (Optional CSS)

    Want your WhatsApp button to float in the corner of every page like a live chat bubble? With a bit of CSS, you can create that modern, always-visible look—no plugin needed.

    ✨ Example CSS:

    Paste this into your Customizer → Additional CSS or your theme’s stylesheet:

    .whatsapp-float {
      position: fixed;
      bottom: 20px;
      right: 20px;
      z-index: 999;
    }

    This positions your button in the bottom-right corner of the screen and keeps it on top of other elements.

    🧱 Wrap Your Button in a Container:

    Now, wrap your WhatsApp anchor tag like this:

    <div class="whatsapp-float">
      <a href="https://wa.me/14151234567?text=Hi%20there!" target="_blank">
        <img src="https://yourdomain.com/path-to-whatsapp-icon.png" alt="Chat with us on WhatsApp" style="width:50px;height:auto;">
      </a>
    </div>

    You can easily change the bottom and right values in the CSS to position it elsewhere, like bottom-left, or higher up the page.

    Best Way to Add WhatsApp Button WordPress Without Plugin in Elementor

    If you’re using Elementor, you can add a WhatsApp button with no code at all—just follow these steps:

    🪄 Step-by-Step:

    1. Drag in a Button Widget anywhere on your page.
    2. Under Content → Link, paste your WhatsApp URL: https://wa.me/14151234567?text=Hi%20there!
    3. Label the Button with something like: “Chat on WhatsApp” or “Need Help? Message Us!”
    4. Toggle “Open in new window” ✅ so it doesn’t navigate users away from your site.
    5. (Optional) Add a WhatsApp icon from Elementor’s icon library or upload your own.

    🎨 Want it to look like a floating chat bubble? You can assign a custom class (like whatsapp-float) and style it using Elementor’s advanced settings or external CSS.

    7. Bonus: Pre-Fill Message Text for Better Engagement

    Want to make it easier for your visitors to start a conversation? Use pre-filled WhatsApp messages in your links to guide users into action and reduce hesitation.

    This is a small tweak, but it makes a big difference.

    💬 Why Pre-Fill Messages?

    • Saves users’ time and effort
    • Encourages immediate engagement
    • Sets the context for your response

    Examples of High-Converting Pre-Filled Messages:

    “Hi! I’m interested in your services.”

    “Can you help me with my order?”

    “I’d like to know more about your pricing plans.”

    “Hi, I saw your site and have a quick question!”

    🔗 Encoded URL Example:

    https://wa.me/14151234567?text=Hi!%20I’m%20interested%20in%20your%20services.

    To create your own, use a free URL encoder to ensure spaces and special characters are properly formatted.

    This small touch makes your WhatsApp button feel more personal and user-friendly, helping turn clicks into conversations.

    Final Thoughts

    Adding WhatsApp chat to your WordPress website doesn’t require a plugin—just a bit of smart HTML and styling.

    This no-plugin method is:

    • ✅ This method of adding a WhatsApp button WordPress without plugin keeps your site fast and flexible.
    • ✅ If you prefer a lightweight solution, learning how to add a WhatsApp button WordPress without plugin is a great skill.
    • ✅ Many developers choose to implement a WhatsApp button WordPress without plugin to avoid slowing down their site.
    • For those using Elementor, you can still create a WhatsApp button WordPress without plugin by using custom links and button widgets.
    • Instead of relying on third-party tools, this guide helps you set up a WhatsApp button WordPress without plugin manually.

    You control exactly where, how, and what the chat button does—without slowing down your site.

    But if you’re looking for:

    • Drag-and-drop simplicity
    • Floating chat bubbles without CSS
    • Built-in WooCommerce support
    • Group invite links and advanced display settings…

    Then it’s time to meet your new favorite tool:
    👉 Chat Help Plugin — all the power of WhatsApp chat with none of the hassle. Free to start, and packed with features to grow.

    Resources

    Here are some helpful links and tools to support your WhatsApp chat setup, whether you’re going plugin-free or exploring advanced features:

    📘 Official WhatsApp Click-to-Chat Documentation

    Learn how WhatsApp’s chat link system works, straight from the source.
    🔗 Click-to-Chat – WhatsApp FAQ

    🎨 Free WhatsApp Icon Packs

    Download high-quality WhatsApp icons for use in your buttons or chat bubbles:

    🛠️ Online URL Encoder

    Use this to safely encode your pre-filled message text into WhatsApp-friendly links:
    🔗 URL Encoder Tool

    Try the Chat Help Plugin

    Prefer the drag-and-drop route with WooCommerce and shortcode support?
    ✅ Install the free plugin here:
    🔗 Chat Help – WordPress.org Plugin Directory

    Frequently Asked Questions (FAQ)

    Can I add a WhatsApp button to WordPress without using a plugin?

    Yes! You can manually add a WhatsApp button using a simple HTML anchor tag and your WhatsApp click-to-chat link. This method is lightweight and gives you full control over design and placement.

    What is the correct format for a WhatsApp click-to-chat link?

    https://wa.me/<number>?text=<message>

    Replace <number> with your full international phone number (no + or spaces), and <message> with a URL-encoded message.

    Will this method work on mobile and desktop devices?

    Yes. On mobile, it will open the WhatsApp app; on desktop, it redirects users to WhatsApp Web. This makes it universally accessible to your visitors.

    How do I make the WhatsApp button float on the screen?

    You can wrap your button in a <div> with a custom CSS class like .whatsapp-float, then add position: fixed styling to float it in any corner. We’ve included the CSS snippet in the guide.

    Why would I use a plugin like Chat Help instead?

    Manual setup is great for minimalists and developers, but if you want:
    – Visual customization
    – WooCommerce integration
    – Shortcodes and group links
    – Easy setup without code

    Then Chat Help Plugin offers all that (and more) for free. You can also check the pro version of Chat Help Plugin for more advanced features.

  • How to add WhatsApp Chat to any WordPress site?

    How to add WhatsApp Chat to any WordPress site?

    Introduction to Adding WhatsApp Chat WordPress

    If you’re looking for a WhatsApp chat WordPress solution that’s fast, free, and beginner-friendly, you’re in the right place. In today’s digital-first world, customers don’t want to wait. They want answers now—and they want them where they already are. And where are they? On WhatsApp.

    With over 2 billion users globally, WhatsApp has transformed from a personal messaging app into a customer service essential. It’s fast, it’s familiar, and it’s already on your customers’ phones.

    So why make them fill out a form, wait for an email, or navigate confusing ticketing systems?

    By adding WhatsApp chat to your WordPress site, you make it ridiculously easy for visitors to reach you instantly. Whether they have a question, want to book a service, or need help with a purchase, they can message you with just one tap. This guide walks you through how to do it effortlessly using a free, beginner-friendly plugin called WhatsApp Chat Help. No coding. No stress. Just smarter communication.

    Why Add WhatsApp Chat to Your Website?

    🛡️ WhatsApp’s Instant Communication Builds Trust

    When users can see a real-time chat option, especially through a platform they trust like WhatsApp, it signals that you’re available and ready to help. That builds credibility faster than any testimonial or About page.

    💰 Boost Conversions and Sales

    Every question answered quickly is a customer one step closer to clicking “Buy.” Especially for e-commerce, WhatsApp can turn indecisive visitors into paying customers, on the spot.

    🛒 Reduce Abandoned Carts (Especially for WooCommerce)

    Unanswered doubts = abandoned carts. Whether it’s sizing, shipping, or product details, live chat via WhatsApp can save the sale before it slips away.

    🤝 Personal Support Without Expensive Tools

    Why invest in pricey chat systems when you already have the most powerful one in your pocket? With WhatsApp and the WhatsApp Chat Help plugin, you deliver friendly, familiar support—without bloated software or added complexity.

    Why Add WhatsApp Chat to Your Website

    Meet Chat Help – The Best Free WhatsApp Chat WordPress Plugin

    If you’ve been looking for a way to connect with visitors through WhatsApp—without juggling code, clunky add-ons, or paid subscriptions—Chat Help is your new best friend.

    This lightweight yet powerful plugin lets you seamlessly embed WhatsApp chat into your WordPress site in minutes. Whether you run a blog, a business site, or a bustling WooCommerce store, Chat Help makes it effortless for your visitors to start a conversation with you or your team.

    And the best part? It’s completely free for all core features. No hidden paywalls. No feature bait-and-switch.

    WhatsApp Chat Help Plugin

    🔑 Key Features at a Glance

    • 💬 Floating Chat Bubble: Add a clean, modern WhatsApp chat bubble that floats across your site. Visitors can reach out with a single tap—anytime, anywhere.
    • 🛒 WooCommerce Integration: Display WhatsApp buttons directly on product pages and product loops, making it easy for potential buyers to ask questions before making a purchase.
    • 🔧 Shortcode Placement: Want a WhatsApp button inside a blog post, sidebar, or footer? Drop in a simple shortcode and place the chat exactly where you want it.
    • 👥 Group Invite Links: Invite visitors to join your WhatsApp groups directly from your site—perfect for communities, webinars, support forums, or promotions.
    • 🧰 No Coding Needed: Everything’s managed through an intuitive admin panel. If you can use WordPress, you can use Chat Help—no developer required.

    Step-by-Step: How to Add WhatsApp Chat Using Chat Help Plugin

    Adding WhatsApp chat to your WordPress site doesn’t have to be complicated. With just a few clicks, you’ll add WhatsApp chat WordPress functionality to your site—without touching a single line of code. Here’s how to get it done:

    1. Install the Plugin

    Where to find it:

    Head over to the WordPress Plugin Directory and search for “Chat Help – Chat Bubble, Chat Button, WooCommerce Button”.

    How to install and activate:

    • Log in to your WordPress dashboard
    • Go to Plugins → Add New
    • Search for “Chat Help”
    • Click Install Now, then Activate

    Boom. You’re ready to start customizing.

    2. Configure Your WhatsApp Settings

    Once activated, go to the plugin’s settings panel (usually found as a dashboard menu called WhatsApp Chat).

    Select Floating Chat Layout:

    The plugin offers different kinds of floating layouts; you can select the one you want to use from the Floating Chat Layout option.

    Add your number:

     Enter your WhatsApp or WhatsApp Business number in international format (e.g., +14151234567 for the US).

    Customize the welcome message:

    Write a friendly, pre-filled message users will see when they click the chat bubble. Example: “Hi! I have a question about your services.”

    This saves them time—and makes starting a conversation feel effortless.

    3. Design and Position the Chat Bubble

    Make your WhatsApp chat bubble look and feel like part of your brand.

    You can easily customize:

    • 🎨 Color: Match your site’s theme
    • 🔘 Icon and label text
    • 📍 Position: Bottom-left or bottom-right of the screen

    Preview before publishing to make sure everything looks perfect. It’s all visual—no coding required.

    4. Enable WooCommerce WhatsApp Buttons (If applicable)

    Running a WooCommerce store? You’re in luck.

    Enable WhatsApp WooCommerce button to appear:

    • 📦 On product pages

    🛍️ Inside product loops (category and shop views)

    This lets buyers ask product-specific questions instantly, reducing hesitation and helping close sales faster.

    5. Use Shortcodes & Gutenberg Blocks to Place Buttons Anywhere

    Need more flexibility? Chat Help supports shortcodes and Gutenberg blocks, allowing you to place WhatsApp buttons anywhere on your site.

    Add buttons in:

    • Blog posts and pages
    • Sidebars and footers
    • Landing pages or contact sections

    Example shortcode:

    [ctw style="1" primary_color="#118c7e" secondary_color="#0b5a51" padding="7px 18px 7px 10px" number="+8815647788844" timezone="Asia/Dhaka" photo="https://chathelp.themeatelier.net/wp-content/plugins/chat-help-pro/src/assets/image/user.webp" name="Jhon" designation="Techinical support" label="How can I help you?" online="I am online" offline="I am offline" visibility="wHelp-show-everywhere" sizes="wHelp-btn-lg" sunday="00:00-23:59" monday="23:00-23:59" tuesday="00:00-23:59" wednesday="00:00-23:59" thursday="00:00-23:59" friday="00:00-23:59" saturday="00:00-23:59"]

    This puts conversion power right where you need it.

    Want to build a community or support group?

    Chat Help lets you:

    • Share WhatsApp group invite links
    • Encourage users to join directly from your website

    Perfect for:

    • 🧑‍🏫 Coaching programs
    • 🗓️ Event coordination
    • 🛠️ Product update groups
    • 💬 Support communities

    Pro Tips to Get the Most Out of Chat Help

    Once you’ve got WhatsApp chat running on your site, take it to the next level with these expert tips to maximize impact:

    ⏰ Set Working Hours or Availability Messages

    Let visitors know when you’re available to respond. You can set autoresponder messages like: “We typically reply within 1 hour during business hours (9AM–6PM).”
    This sets expectations and builds trust, even if you’re not online 24/7.

    📞 Use Different Numbers for Sales and Support

    Running a team? Set up separate buttons for sales inquiries and customer support with different phone numbers. This helps streamline responses and keeps communication efficient.

    🎨 Style the Button to Match Your Theme

    Customizing the look of your chat bubble to match your site’s colors and vibe creates a seamless, professional appearance. A consistent design builds brand credibility and avoids visual clutter.

    Make it easy for users to start the conversation by using pre-filled messages. For example: “Hi, I have a question about the {productName} I saw on your website.”
    This saves users from typing and gets them straight to the point.

    Final Thoughts

    Adding WhatsApp to your WordPress site used to feel like a developer-only task. Not anymore. Whether you’re a beginner or a pro, adding WhatsApp chat WordPress integration can completely transform how you engage with customers.

    With Chat Help, you can launch a clean, fast, and fully functional WhatsApp chat system in minutes, with zero coding required.
    It’s a must-have tool for:

    • 📈 Small business owners looking to close more sales
    • 🛒 WooCommerce store managers aiming to reduce cart abandonment
    • 🤝 Service providers who want to make client communication as easy as possible

    In short: if you want to be more reachable, more responsive, and more trusted, Chat Help delivers.

    So why wait? Install Chat Help today and start the conversation.

    Frequently Asked Questions (FAQ)

    Is the Chat Help plugin really free?

    Yes! The core features—like the floating WhatsApp bubble, WooCommerce integration, group links, and shortcode support—are all included in the free version. There’s also a Pro version available with advanced features for users who want more customization and control.

    Do I need to know how to code to use Chat Help?

    Not at all. Chat Help is built for beginners and business owners who want results without tech headaches. You can install and set it up directly from your WordPress dashboard—no coding skills required.

    What’s included in the Pro version?

    The Pro version of Chat Help unlocks multiple agents for floating bubble, advanced floating button, premium design options, advanced display rules, targeted chat triggers, and more tools to fine-tune your WhatsApp experience. It’s ideal for businesses that want deeper integration and professional-level features.

    Can I use Chat Help with WhatsApp Business?

    Yes! Chat Help supports both personal WhatsApp and WhatsApp Business accounts, making it flexible for businesses of all sizes and types.

    Will Chat Help slow down my website?

    No. Chat Help is lightweight and performance-optimized. It won’t impact your loading speed, ensuring smooth performance for visitors on all devices.

    What makes Chat Help the best WhatsApp chat WordPress plugin?

    Chat Help combines ease of use, WooCommerce support, and customization, making it the top choice for anyone wanting to add WhatsApp chat WordPress support quickly and professionally.

Need Help? Chat with us
Agent
John Doe
Typically replies within a day